[ audio]
Note: Do not put space between “[” and “audio”.
You can also use build-in embeds and simply put the media file on its own line:
My cool content
https://my.mp3s.com/cool/songs/coolest.mp3
More cool content
Usage
I have an old post that has an audio file in the Media Library attached to it, and I want to use the new shortcode:
[ audio]
Note: Do Not put Space between “[” and “audio”.
I have the URL for an MP3, from the Media Library or external, that I want to play:
[audio src="audio-source.mp3"]
I have a source URL and fallbacks for other HTML5-supported filetypes:
[audio mp3="source.mp3" ogg="source.ogg" wav="source.wav"]
Options
The following basic options are supported:
src
(string) (optional) The source of your audio file. If not included it will auto-populate with the first audio file attached to the post. You can use the following options to define specific filetypes, allowing for graceful fallbacks:
- ‘mp3’, ‘m4a’, ‘ogg’, ‘wav’, ‘wma’
Default: First audio file attached to the post
loop
(string) (optional) Allows for the looping of media.
- “off” – Do not loop the media.
- “on” – Media will loop to the beginning when finished and automatically continue playing.
Default: “off”
autoplay
(string) (optional) Causes the media to automatically play as soon as the media file is ready.
- “off” – Do not automatically play the media.
- “on” – Media will play as soon as it is ready.
Default: “off”
preload
(string) (optional) Specifies if and how the audio should be loaded when the page loads. Defaults to “none”
- “none” – The audio should not be loaded when the page loads.
- “auto” – The audio should be loaded entirely when the page loads.
- “metadata” – Only metadata should be loaded when the page loads.
Default: “none”
Related
WordPress Shortcodes: video, caption, embed, gallery, playlist
Changelog
- Updated 2021-10-18
- Added changelog
- Corrected the links to the codex pages for the caption, embed, gallery and playlist shortcodes
The Edit Media page is where you manage information about your media that is saved in the Media Library. To reach the Edit Media page, go to Media > Library and click the name of the media item or the Edit link that appears below the name on hover. You can also reach this page by clicking on the Edit link when adding new media to your site.
The data entered on the Edit Media page is often used by attachment pages and galleries if the theme or plugin chooses to display it, and the data is also used as the default values at the time an image is inserted into a page. Once the image has been inserted as an individual image, it becomes disconnected from the data in the media library and you can use the Image Details screen to update it on a per-image basis.
In addition to managing meta data such as title, caption, alt text, and description, there are also added controls for performing basic media edits such as rotating, scaling, and cropping images. For more information see the Edit Image section.
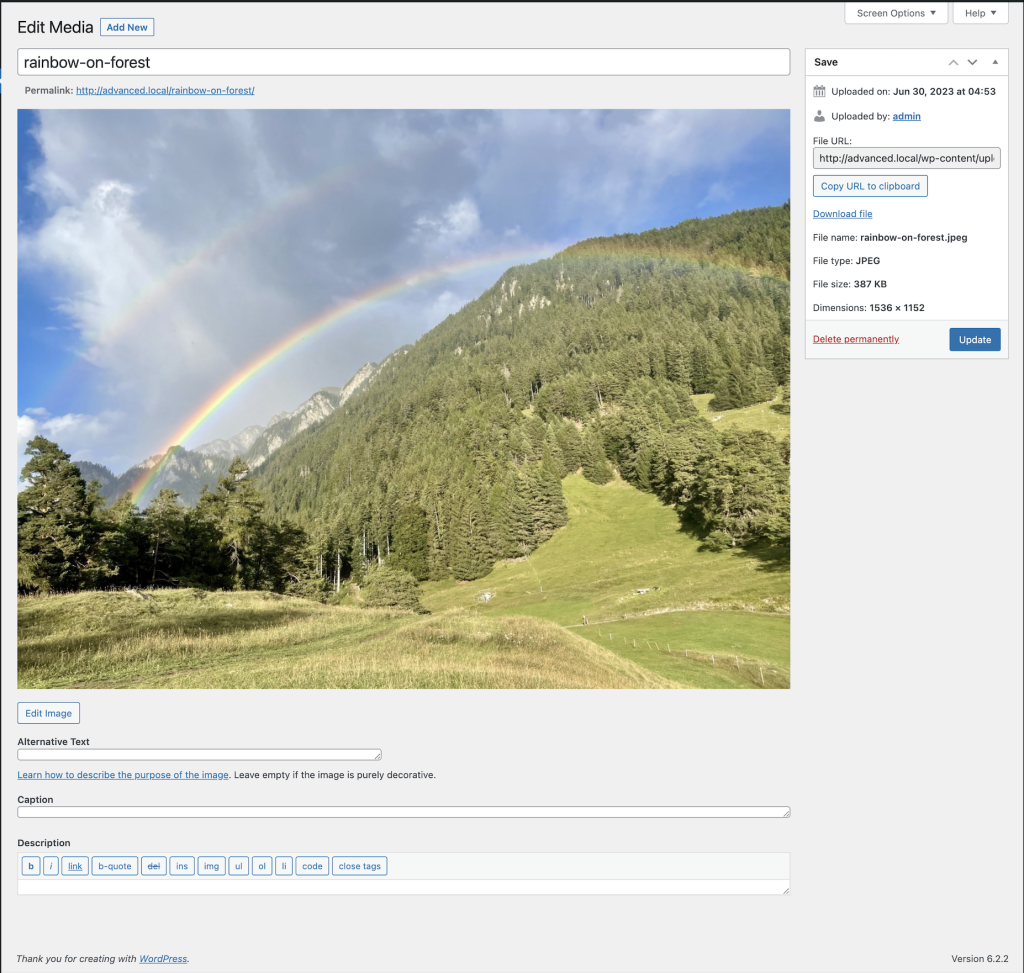
Edit media page
Title
The name of the media. A title is displayed in the File column of the Media Library Screen and is often shown on attachment pages and galleries if themes or plugins are designed to display it.
Permalink
This is the URL of the media attachment page. There is also a link to view the attachment page. Next to this, there may be a button to edit the permalink—if there isn’t, you can change the permalink by activating ‘Slug’ from the screen options and changing the slug’s value.
Edit image button
(Image files only) allows you to make edits such as rotate, scale, and crop.
Caption
A brief explanation of the media.
Alternate text
The alt text for the image, e.g. “The Mona Lisa” to describe the media. Used for accessibility.
Description
An explanation of this particular media.
File URL
Read only display of a direct link to the media file.
Copy URL to clipboard:
Click to copy the URL of the file you are editing into the clipboard.
Download file
Makes it easier for users to download their uploaded media by providing a download link on the attachment details screen and in the media modal.
Save meta box
Displays information about your media, such as the upload date, web address, file name, type, size, and dimensions. Also includes actions to Delete Permanently or Update any change you have made.
More edit media options

Note: The following Meta Boxes may not be visible by default. You can enable them by clicking on the Screen Options tab at the top right of the Edit Media page.
Discussion
Turn the ability to leave comments and/or trackbacks on the media attachment page on or off
Comments
List of current comments saved for this media file
Slug
the attachment page slug
Author
the Author for the media
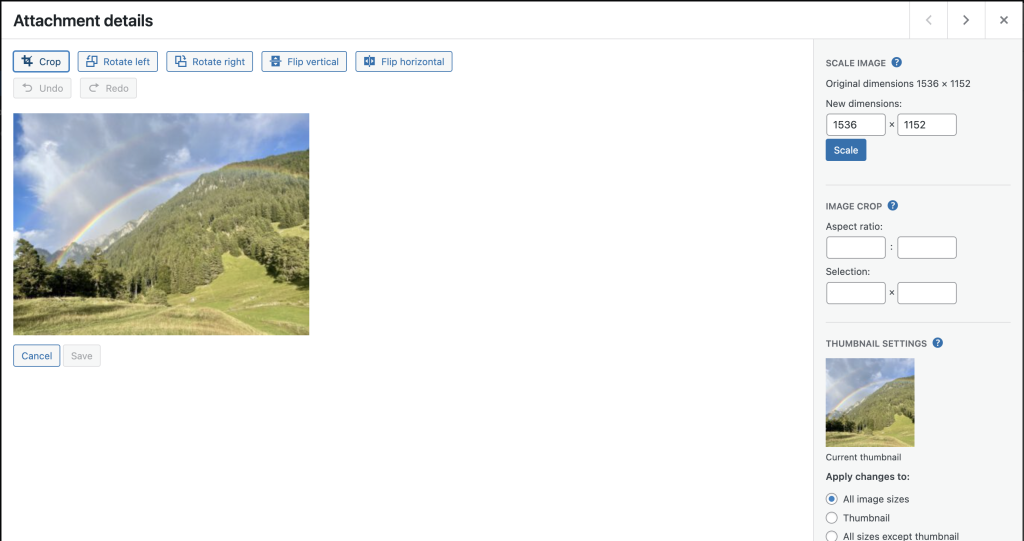
Edit image
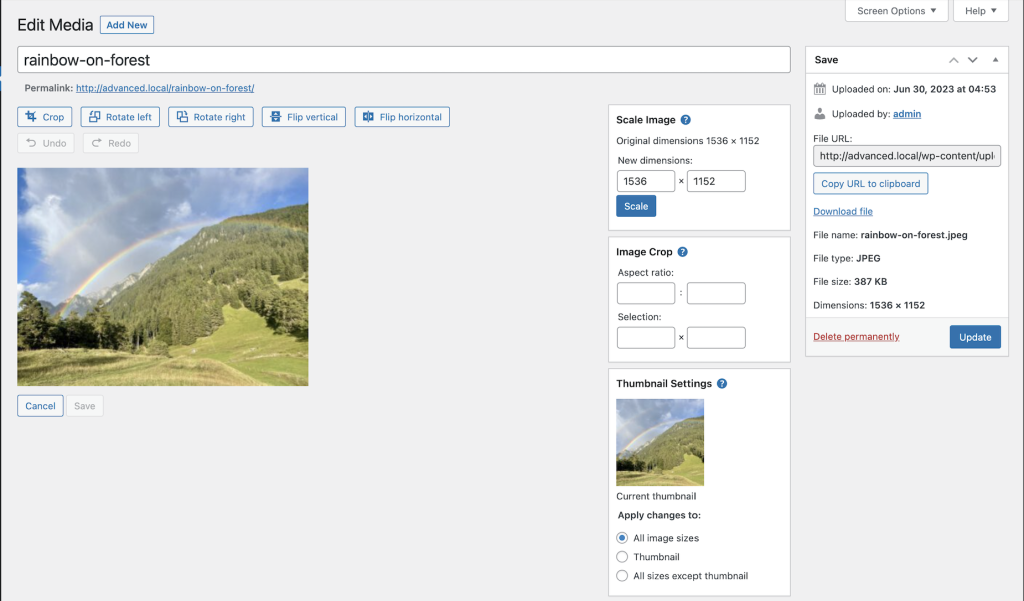
Clicking the Edit Image button launches the image editor screen, giving you access to several useful image editing controls. The edits you make to your image are non-destructive and you can restore the image to it’s original (uploaded) specifications at any time. Here are the various controls available to you in this Edit Image mode:
Crop
To crop the image, first, click on the image and drag to make your selection. Once a selection has been made, then click the crop icon above the image to finalize the crop. You can use the Aspect ratio and Selection option to make further adjustments or use keyboard shortcuts to fine-tune your crop selection before clicking the crop icon.
Rotate left button
Rotate the image 90 degrees counter-clockwise.
Rotate right button
Rotate the image 90 degrees clockwise.
Flip vertical button
Flip the image upside-down.
Flip horizontal button
Flip the image left-to-right.
Undo/Redo button
Remove or restore your last edit. You can click as many times as you want in succession to “step” through the edit history.
Scale image
Proportionally scale the original image. For best results, scaling should be done before you crop, flip, or rotate. Images can only be scaled down, not up. The original dimensions are displayed as a guideline above the box for entering new dimensions. Click Scale button to display the new scaled image. Also Restore Original Image button appears to allow you restore the change.
Restore original image
If changes have been made to an image, the Restore Original Image pull-down allows you to discard any changes and restore the original image. Previously edited copies of the image will not be deleted. Press the Restore Image button to complete the action.
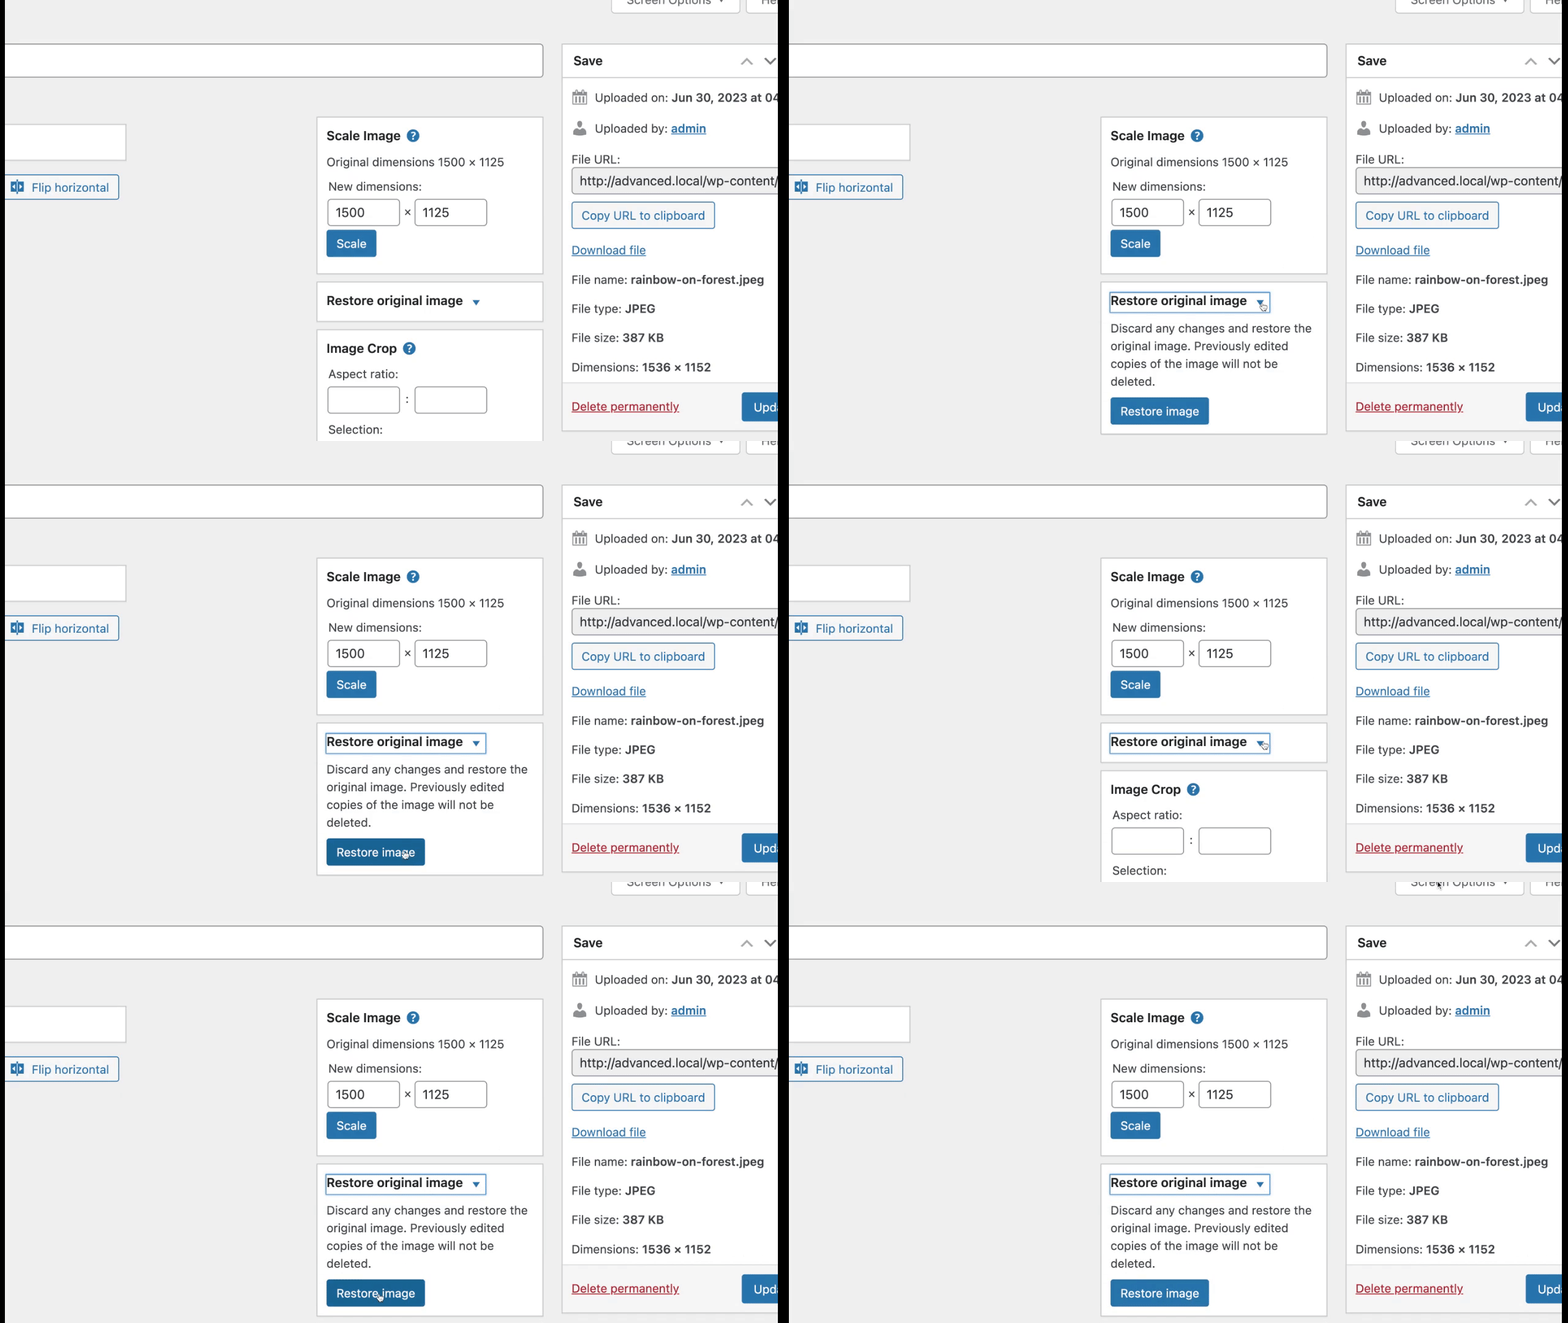
Image crop
Used in combination with the Crop icon, this tool allows you to make the following precise adjustments:
- Crop aspect Ratio: You can specify the crop selection aspect ratio then hold down the Shift key while dragging to lock it. The values can be 1:1 (square), 4:3, 16:9, etc. If there is a selection, specifying aspect ratio will set it immediately.
- Crop selection: Once started, the selection can be adjusted by entering new values (in pixels). Note that these values are scaled to approximately match the original image dimensions. The minimum selection size equals the thumbnail size as set in the Settings Media Screen.
Thumbnail settings
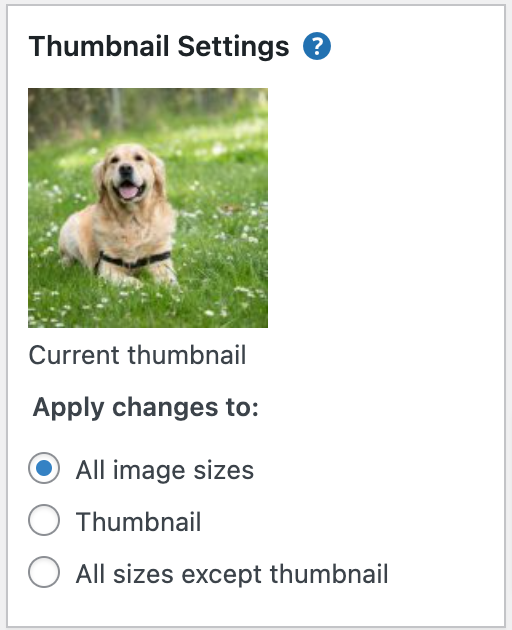
WordPress thumbnails are smaller, usually square, versions of your main image. They are automatically created each time you upload a new image. By default, a WordPress thumbnail image is 150px x 150px, and cropped as a perfect square. (You can adjust this on the Settings Media Screen.)
When editing an image, you have three options. You can apply your changes to
- All image sizes
- Thumbnail
- All sizes except thumbnail
Save
Use this to save the changes made to an image and return to the Edit Media screen for this image.
Cancel
Use this to cancel any operation that has been performed on the image in the current session.
Keyboard shortcuts
When cropping your image, these keyboard combinations can ‘fine-tune’ the size of the crop frame. Note: The arrow key can be any of four arrow keys–up arrow, down arrow, left arrow, or right arrow:
- Arrow: move by 10px
- Shift + arrow: move by 1px
- Ctrl + arrow: resize by 10px
- Ctrl + Shift + arrow: resize by 1px
- Shift + drag: lock aspect ratio
Further reading
- Media Add New Screen
- Media library screen
- Settings Media Screen
- Image Size and Quality
- Use Images
- Use image and file attachments
- Inserting Images into Posts and Pages (Block Editor)
- Inserting Images into Posts and Pages (Classic Editor)
Changelog
- Updated 2023-07-04
- Updated screenshots for media item edit page, attachment details and made those relevant to 6.2.2
- Updated GIF for Restore original image
- Made sure there is alt tag and caption for all the images
- Added the paragraph Download file for edit media page
- Made sure all the Headings are in sentence case
Physical Size
The physical size of an image is based upon two things: The size of the image on the screen and the file size. Generally, the file size is treated as a different issue.
File Size
This is the size of the file on your hard drive or server.
Resolution
Resolution refers to the number of pixels in an image. Resolution is sometimes identified by the width and height of the image as well as the total number of pixels in the image.
File Type
There are basically X image types popularly found on the Internet: jpeg,gif,png and (for favicons (the icons next to the address)) ico.
The physical size of the image is information we need to know in order to determine how much “space” will the image occupy on a web page. If your WordPress Theme features a fixed width content area of 600 pixels and the image you want to use is 800, the image will push the sidebar and layout of your web page around, messing up your design. Images within that 600 pixel width need to be restricted to that maximum width in order to protect the layout of your page. It’s up to you to determine what size they should be from there, matching the image to your overall layout and styles.
File size dictates the time it takes to load your page, the larger the file size, often increased because of a high image resolution quality, the longer it will take to load. People often don’t have the patience to wait through long web page loads, so keeping your file sizes low speeds up your web page access times. Typically, large high quality images should be kept between 100K and 60K. Smaller images should be closer to 30K and lower.
The resolution of the image dictates its clarity. The higher the resolution, though, the larger the file size, so you have to make a compromise between quality and file size.
Luckily, the various file types most commonly used on the Internet have compression features. When you save the file as one of these types, it condenses or compresses the data information in the image file. Internet browsers can decompress this information to display the image on the screen. Some graphic software programs allow you to set the compression rate to control the quality of the image (and file size) at the time you save it. Depending upon your use of the images on your site, you may have to experiment with this to get the right ratio that keeps the resolution quality good while maintaining a small file size.
Websites use four common file types. The end of a filename (called the extension) tells what type it is. One type, ico, is to make a favicon file — but this is usually only done when a website is first set up. The other three types are used for general images:
jpg(JPEG) is good for photographs. Saving a photo asjpgremoves detail from the photo. Good photo editors let you control how much detail is removed (the “compression”). Different photos need different compression; doing this carefully and viewing the result can give you a usable photo with a small file size.gifcan be poor for photographs. It’s better for line art, like logos, with solid areas of the same color.pngis for both photographs and line art. It compresses photos without losing detail, but usually makes larger photo files than JPEGs. Some older browsers don’t completely supportpng, though.
If you aren’t sure which file type is best for a particular image, try saving the image in more than one type and comparing the file sizes. Using the right type can make a big difference! There’s more information in Image file type and format guide.
Resizing Images
Not all graphic software packages allow you to resize images, though most should. Check your graphics software table of contents or index for resize, size, transform, reduce, or enlarge, all synonyms for the for the same thing. If they don’t have the feature, you may have to find different software.
The process of resizing images is fairly simple. There are usually two methods:
1) You can resize an image through the use of tools provided which allow you to manually shift the edges of an image to deform or resize the image. The best way is to grab a corner, not the edge, to resize the image. The corner “handle” will usually resize the image maintaining the overall height-width ratio. Check your manual for specific instructions.
2) The other method involves simply specifying the image’s final size. The advanced graphics programs allow you to set it by exact dimensions or a percentage of reduction or enlargement.
After resizing the image, the image may be smaller, but it may also be slightly out of focus. You can sharpen the focus of the small image by using the sharpen feature in your software.
When you have fine-tuned your small sized image or new thumbnail, export the image as a jpg, gif, or png.
Further reading
- Use Images
- Use image and file attachments
- Settings Media Screen
- Media Add New Screen
- Edit Media
- Media library screen
- Inserting Images into Posts and Pages (Block Editor)
- Inserting Images into Posts and Pages (Classic Editor)
Resources
]]>Note: This page uses Block Editor. If you are a Classic Editor User, refer this page.
When creating or editing a WordPress page or blog post, you can easily add images to a post or page using the Image Block.
Adding the Image Block to the Page or Post
To add an image to your page or post, you’ll add an Image Block.
You can also add an Image Block from within your content. To do that, hover over the block you’d like to add the Image Block above or below and click the plus sign. Then select the Image block from the available blocks shown.

Detailed instructions on adding blocks can be found here.
Once you’ve added the block, you will see the option to upload an image, select an image from the Media Library or insert an image from a URL.

Adding the Image to the Block
There are four ways you can add an image to the block. Three offered via buttons on the Image block placeholder and one drag & drop way to add images to your post or page.
- Upload from your computer
Click on the “Upload” button. This opens up a dialog box pointing to your own hard drive. Select the file you want to upload and click on the “Open” button.
- From the Media Library
You can select an existing image from your Media Library by clicking the “Media Library” button.
- Insert from URL
Click on the “Insert from URL” button and paste or type in the URL for the image.
Notes:- URL needs to be a fully qualified URL starting with https:// and the domain name and not be a relative reference to your own site.
- Images inserted via URL, will not be saved into your Media Library. They keep referenceing the image from the site of the URL. If the site disappears, your image will disappear from your post or page.
- Drag & Drop
You can select an image from your Explorer or Finder window on your computer and drag it into the block editor window. then drag and drop it into the block.
Block Toolbar
Besides the “Mover” and “Drag & Drop Handle” on the left side, the Block Toolbar for the Image Block shows five buttons:

- Block Styles and Transform to
- Change alignment
- Replace image
- Insert Link
- More Options
Block Styles / Transform to

In this drop-down, you see the two styles for you image.
The “Default” style displays your image as it was uploaded.
The “Rounded” style offers you a display with rounded corners
Transform to
You can transform an image block into five other blocks:
A Group block, a Gallery block, a Cover block, a File block and a Media & Text block. Please use the links to learn more about these blocks that use an image.
Replace

The “Replace” button from the toolbar provides you with three choices to replace the existing image with another one: via the Media Library, Upload from your computer or Insert from URL. These are the same choices you encountered at the beginning of this article.
Insert Link
“Insert Link” Button allows you to add a link to your image. The link options are:

- Paste URL – Links to a website or a different post or page on your own site. Can be relative or absolute (“/contact-page” or “https://google.com”). Type in a keyword and the Search will find a page/post from your own site.
- Media File – Links to a page with just the image
- Attachment Page – Links to the WordPress Attachment Page with details about the image
More Options:
The image block has a number of additional options that can be accessed clicking on the three-dot menu on the right hand-side part of the tool bar. These options are common to all blocks, you can read more about them here.

Block Settings

When you add a new block to your post or page content, it automatically brings up the block’s settings in the right-hand menu.
Styles
Image can be displayed two different styles.
The “Default” style displays your image as it was uploaded.
The “Rounded” style offers you a display with rounded corners
Via the Default Style drop-down you can select a default display variation.

Image Settings
The Image settings include Alternative Text, Image Size, Image Dimensions, and Advanced.
The Alt Text setting is where you would add a description of the image for people who can’t see it. This helps with accessibility as well as search engine optimization.


The Image Size setting allows you to select from Thumbnail, Medium, Large and Full Size.
- Thumbnail: Displays a small thumbnail-sized version of your image on the page/post. Note, by default the Thumbnail size is a square, so some cropping of your original image may occur.
- Medium: Displays a medium-sized version of your image on the page/post. This is a good size to use with Left/Right alignments, as it leaves sufficient space for legible text to either side.
- Large: Displays a large-sized version of your image on the page/post. Note: WordPress will determine the width of the content column of your theme, and display the largest possible image for that space.
- Full Size: Displays a full-sized version of your image on the page/post. Note: WordPress will determine the width of the content column of your theme, and display the largest possible image for that space. If your original image is larger than this column width, the full size of the image may not be displayed.
The Image Dimensions setting allows you to manually set a height and width or set the image to 25%, 50%, 75% or 100% of the image’s full size. There’s also a Reset button there in case you need to revert your changes
Advanced
Title attribute

Beyond the Alt-text, you can also add a title attribute for your image, describing briefly the role of this image on the page.
To learn more, follow the link to the explanation on W3.org, the standards body for HTML.
Additional CSS class(es)
In the “Additional CSS class(es0 section you can one or more CSS class(es) to your block, allowing you to write custom CSS and style the block as you see fit.

Image Caption

Beneath the Image in the Image block, there is an option for you to add a caption. You can format the text in Bold, italics and add a link.
Further reading
- Embeds – Inserting different media types.
- Gallery – Inserting a gallery block to pages or posts
- Image Size and Quality
- Use Images
- Use image and file attachments
- Settings Media Screen
- Media library screen
- Media Add New Screen
- Edit Media
- Inserting Images into Posts and Pages (Classic Editor)
Changelog
- Updated: 2023-08-08
- Updated “More Options” section and added link to the external article.
- Updated: 2023-04-14
- Updated links.
- Replaced Resources with Further reading, added more related links.
- Updated: 2020-04-24
- Updated the Resource section with Block editor links.
- Added to “Common Block” Category
- Updated: 2020-04-23
- Added the Block Toolbar section
- Replaced one animated gifs with newer interface
- Replaced three animated Gifs with videos of the current interface (5.4)
- Removed the various ways to add a block to a post with the link to the Add a Block page.
- Add a Changelog Box
- Created: 2019-09-12
When creating or editing a WordPress page or blog post, you can easily add images at any time using the WordPress Media Uploader tool. Here’s how to add an image, step-by-step, using the media uploader:
Step 1 – Placing your cursor

In order to add an image to your page or post, you must first insert your cursor in the place in the text where you want the image to appear. By placing your cursor within your text, you can add images inline with your content. You can also place your cursor on a blank line if you want the image to appear by itself instead.
Tip: It’s a good idea to place your cursor on the left margin of your text, even if you want the image to appear on the right. That’s because there is a special setting called Alignment that allows you to control whether the image appears on the right or the left side of the text. It even controls how text flows around the image automatically.
Step 2 – Click the Add Media button
Once you’ve placed your cursor on the line where you want your image to appear, click on the Add Media button to launch the media uploader interface, and then select the Insert Media option from the list of actions in the left side of the media uploader window.

Step 3 – Add or Select Your Image
You can add or select the image you want to add to your page or post by choosing from either of the following options in the center of the media uploader window:
- Upload Files: Upload the image you want to use from your computer by dragging it into the upload area.
- Media Library: Select from any previously uploaded images in the media library by clicking on the one you wish to add to your page or post.

Once you have selected or uploaded the image you want to add, You will see a checkbox next to the thumbnail confirming your selection, and see information about it displayed in the Attachment Details pane on the right hand side of the media uploader interface.
Step 4 – Attachment Details

The Attachment Details pane displays a small un-cropped thumbnail of the image, as well as important information such as the filename, date uploaded, and image dimensions in pixels.
There are also action links that allow you to Edit Image, which takes you to the page, or to Delete Permanently to remove the image from your site.
In addition, you can edit the following media information:
- Title: The title of this media.
- Caption: The caption for this image. The text you enter here will be displayed below the image.
- Alternate Text: Enter the Alt text for the image, e.g. “The Mona Lisa” to describe the media.
- Description: A description for this particular media.
For more information on these media settings, see the Edit Media page.
Step 5 – Attachment Display Settings

The Attachment Display Settings pane controls how the image is displayed when viewed on the site.
You have options to set how you would like the image aligned on the page (in relation to the text and margins) and what the link behavior of the image will be, In addition you can set what size image you would like to display on your page.
Image Alignment
The Alignment setting allows you to determine where you would like the image to appear in your content area and how it interacts with any text on the page. You have the following image alignment options to choose from:
- Left: Aligns the image on the left hand margin, and any text that is on the page wraps (or flows) around the image to the available space on the right.
- Right: Aligns the image on the right hand margin, and any text that is on the page wraps (or flows) around the image to the available space on the left.
- Center: Aligns the image to the center of the page, with no text displayed around it.
- None: Inserts the image in to the page with no alignment

Image Link
The Link To settings determine the URL/web address to which the image will be linked when clicked on by a visitor to your site. You can specify the following image link settings:
- Attachment Page: Links your inserted image to its WordPress media attachment page.
- Media File: Links your inserted image directly to the original, full-size version of the file.
- Custom URL: Allows you to set a custom link URL for your inserted image to link to when clicked.
- None: This setting will remove the link completely, rendering the image “un-clickable”.
Image Size
The Size settings determine the size of the image you are adding to your site. By default WordPress creates a range of four image size for you to choose from:
- Thumbnail: Displays a small thumbnail-sized version of your image on the page/post. Note, by default the Thumbnail size is a square, so some cropping of your original image may occur.
- Medium: Displays a medium-sized version of your image on the page/post. This is a good size to use with Left/Right alignments, as it leaves sufficient space for legible text to either side.
- Large: Displays a large-sized version of your image on the page/post. Note: WordPress will determine the width of the content column of your theme, and display the largest possible image for that space.
- Full Size: Displays a full-sized version of your image on the page/post. Note: WordPress will determine the width of the content column of your theme, and display the largest possible image for that space. If your original image is larger than this column width, the full size of the image may not be displayed.

You can visit the Settings > Media section of your WordPress dashboard to customize the above image sizes.
Step 5 – Inserting the image

Once you have determined your image settings, click on the blue Insert into post or Insert into the page button, to add the image to your page or post. After the image uploader window closes, you will see the image in the text editor window, including a preview of the alignment of the image, if you have specified an image alignment.
At any time, you can edit the image settings by clicking on the Edit Image button in the upper left hand corner. You can remove the image from your page/post by clicking on the Remove Image button.
Further reading
]]>Overview
Image galleries are a great way to share groups of pictures on your WordPress site. The Create Gallery feature of the WordPress media uploader allows you to add a simple image gallery to pages or posts on your site.

This article introduces how to add an image gallery using the media library.
Adding image gallery using media library
Here’s how to add an image gallery step-by-step, using the media uploader:
Note: Before adding a gallery, you should be comfortable using the Add media feature and the media uploader to add images to your media library and place them into posts.
Step 1 – Place your cursor
A gallery can go anywhere on a page or post – by itself on a blank page, or above, below, or in the midst of text. Start by placing your cursor where you want the gallery to appear – if it’s in between blocks of text, like in the photo example below, consider adding a return and placing your cursor on a new line so there’s space above and below.

Place cursor where gallery should be
Step 2 – Select the Gallery block
Once you’ve placed your cursor where you want your image gallery to appear, click on the + symbol on the left of the cursor and select Gallery.

Step 3 – Add and/or Select the Images You Want to Include
You can add or select the images you want to include in your image gallery by choosing from either of the following options in the center of the media uploader window:
- Upload Files: Upload the images you want to use from your computer by dragging them into the upload area. You can add more than one image, and they will be automatically grouped together as an image gallery.
- Media Library: Select from previously uploaded images in the media library by clicking on the ones you wish to add to the gallery. You will see a checkbox next to your selections.

Note: You can create an image gallery using directly images from your computer simply by switching back and forth between the Upload Files and Media Library options.
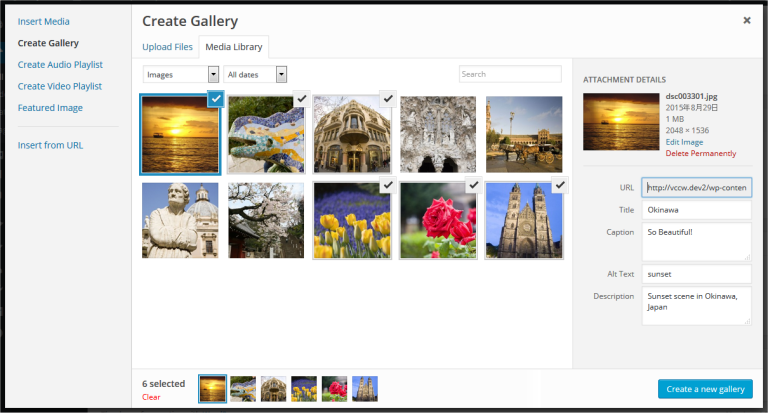
As you upload and/or select images, you will see your selection confirmed on the Insert Media screen by checkboxes at the top corner of each thumbnail. Also, a row of thumbnails appears at the bottom of the window to help you keep track of all the images you’ve selected. When you are happy with your selection, click the Create a new gallery button.

Step 4 – Edit Your Gallery
On the Edit Gallery page, you can do the following things before inserting the gallery you have created into your page or post:
- Rearrange your images: Drag and Drop image thumbnails to rearrange the order of images in your gallery.
- Reverse Order: Reverses the order of the images in your gallery.
- Add image descriptions: Add descriptions to your images (optional) which appear as image captions below each thumbnail in the gallery.
- Remove images: Hover over a thumbnail and click on the “X” to remove any of the images you previously selected.
- Add more images: Click on the “Add to Gallery” link in the left-hand sidebar and add or select the images you want to include in your image gallery by choosing from either “Upload Files” or “Media Library” tabs.
- Cancel Gallery: Click on the “Cancel Gallery” link from the actions on the left to exit the Edit Gallery page and cancel your image gallery.

After inserting your gallery, you also have several Gallery Settings available in the right pane of your editor screen:

- Links To: Controls whether the gallery thumbnails (on the published page/post) link to the image attachment page or directly to the source image file itself.
- Columns: Set the number of columns you would like to have in your gallery. 3 Columns is the default settings, which is ideal for most sites.
Editing Existing Galleries
Within the visual editor, the image gallery is displayed as a series of thumbnail images.

When you click any area of the image gallery, icon buttons appear top of the area. At any time, you can edit the images or settings of your gallery by clicking on the Edit button. You can remove the image gallery at any time by clicking on the Remove button.

Resources & Gallery Plugins
]]>Overview
Image galleries are a great way to share groups of pictures on your WordPress site. The Create Gallery feature of the WordPress media uploader allows you to add a simple image gallery to pages or posts on your site.

This article introduces how to add an image gallery using the media library, and explains gallery shortcode which will be generated and embedded into the post or page.
Adding image gallery using media library
Here’s how to add an image gallery step-by-step, using the media uploader:
Note: Before adding a gallery, you should be comfortable using the Add media feature and the media uploader to add images to your media library and place them into posts.
Step 1 – Place your cursor
A gallery can go anywhere on a page or post – by itself on a blank page, or above, below, or in the midst of text. Start by placing your cursor where you want the gallery to appear – if it’s in between blocks of text, like in the photo example below, consider adding a return and placing your cursor on a new line so there’s space above and below.

Step 2 – Click the Add Media button
Once you’ve placed your cursor where you want your image gallery to appear, click on the Add Media button (located left above the editing window) to launch the media uploader interface. In the resulting popup window, select the ‘Create a Gallery’ option from the list of actions on the left.

Step 3 – Add and/or Select the Images You Want to Include
You can add or select the images you want to include in your image gallery by choosing from either of the following options in the center of the media uploader window:
- Upload Files: Upload the images you want to use from your computer by dragging them into the upload area. You can add more than one image, and they will be automatically grouped together as an image gallery.
- Media Library: Select from previously uploaded images in the media library by clicking on the ones you wish to add to the gallery. You will see a checkbox next to your selections.

Note: You can create an image gallery using any combination of new images and previously uploaded images simply by switching back and forth between the Upload Files and Media Library tabs.
As you upload and/or select images, you will see your selection confirmed on the Insert Media screen by check boxes at the top corner of each thumbnail. Also, a row of thumbnails appears at the bottom of the window to help you keep track of all the images you’ve selected. When you are happy with your selection, click the Create a new gallery button.
Step 4 – Edit Your Gallery
On the Edit Gallery page, you can do the following things before inserting the gallery you have created into your page or post:
- Rearrange your images: Drag and Drop image thumbnails to rearrange the order of images in your gallery.
- Reverse Order: Reverses the order of the images in your gallery.
- Add image descriptions: Add descriptions to your images (optional) which appear as image captions below each thumbnail in the gallery.
- Remove images: Hover over a thumbnail and click on the “X” to remove any of the images you previously selected.
- Add more images: Click on the “Add to Gallery” link in the left hand sidebar and add or select the images you want to include in your image gallery by choosing from either “Upload Files” or “Media Library” tabs.
- Cancel Gallery: Click on the “Cancel Gallery” link from the actions on the left to exit the Edit Gallery page and cancel your image gallery.
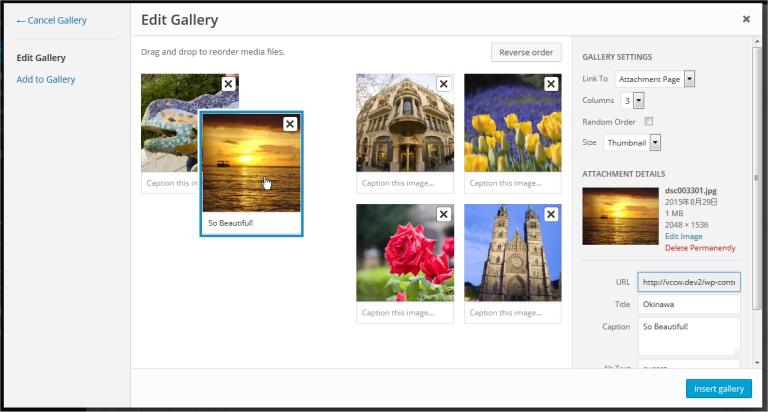
Before inserting your gallery, you also have several Gallery Settings available in a pane on the right to control the following:
- Links To: Controls whether the gallery thumbnails (on the published page/post) link to the image attachment page or directly to the source image file itself.
- Columns: Set the number of columns you would like to have in your gallery. 3 Columns is the default settings, which is ideal for most sites.
- Random Order: Enables your gallery to display your image thumbnails in a random order each time they are viewed on the site.
- Size: Changes each image size in gallery. Available options are Thumbnail, Media, Large and Full Size.
Editing Existing Galleries
Within the visual editor, the image gallery is displayed as a series of thumbnail images.
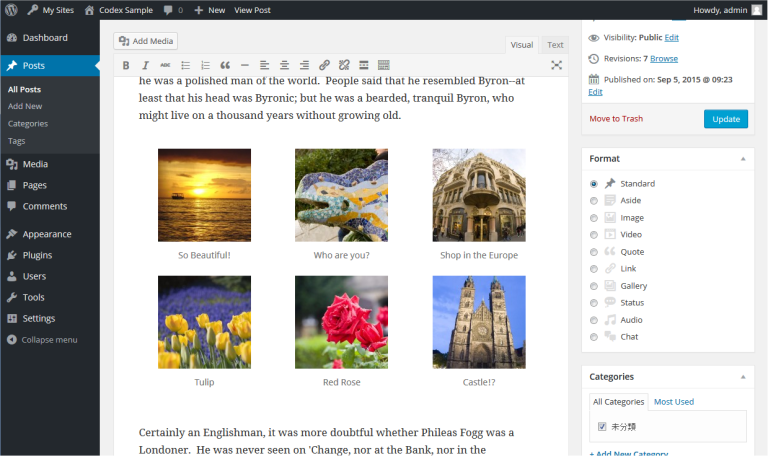
When you click any area of the image gallery, icon buttons appear top of the area. At any time, you can edit the images or settings of your gallery by clicking on the Edit button. You can remove the image gallery at any time by clicking on the Remove button.

Gallery shortcode
Above steps generates Gallery shortcode with image ids and other options, and embedded into the Post or Page, like this:
[gallery ids="729,732,731,720"]You can specify options direct to this shortcode.
Usage
There are several options that may be specified using this syntax:
[gallery option1="value1" option2="value2"]Options
The following basic options are supported:
orderby
Specifies how to sort the displayed thumbnails. The default is “menu_order.”
Options:
- menu_order – You can reorder the images in the Gallery tab of the Add Media pop-up.
- title – Order images in the Media Library, based on the image title.
- post_date – Sort images by date/time.
- rand – Order images randomly.
- ID
order
Specifies the sort order used to display thumbnails. ASC or DESC. For example, to sort by ID, use DESC:
[gallery order="DESC" orderby="ID"]columns
Specifies the number of columns. The gallery will include a break tag at the end of each row, and calculate the column width as appropriate. The default value is 3. If columns is set to 0, no row breaks will be included. For example, to display a 4 column gallery:
[gallery columns="4"]id
Specifies the post ID. The gallery will display images which are attached to that post. The default behavior, if no ID is specified, is to display images attached to the current post. For example, to display images attached to post 123:
[gallery id="123"]size
Specifies the image size to use for the thumbnail display. Valid values include “thumbnail,” “medium,” “large,” “full” or any other additional image size that was registered with add_image_size(). The default value is “thumbnail.” The size of the images for “thumbnail,” “medium,” and “large” can be configured in the WordPress admin panel under Settings > Media. For example, to display a gallery of medium sized images:
[gallery size="medium"]Some advanced options include:
itemtag
The name of the XHTML tag used to enclose each item in the gallery. The default is “dl.”
icontag
The name of the XHTML tag used to enclose each thumbnail icon in the gallery. The default is “dt.”
captiontag
The name of the XHTML tag used to enclose each caption. The default is “dd.” For example, to change the gallery markup to use div, span and p tags:
[gallery itemtag="div" icontag="span" captiontag="p"]link
Specify where you want the image to link. The default value links to the attachment’s permalink. Options:
- file – Link directly to the image file.
- none – No link.
[gallery link="file"]include
Comma-separated attachment IDs that include only the images from these attachments.
[gallery include="23,39,45"]exclude
Comma-separated attachment IDs that exclude specific images from these attachments. Please note that include and exclude cannot be used together.
[gallery exclude="21,32,43"]Resources & Gallery Plugins
]]>Media can be uploaded via the Media Add New Screen?or?Media Library Screen?in the admin area, or via quick links on the edit screen.
In order to upload media, you may need to ensure that the correct?file permissions?are set for the wp-content directory in your WordPress installation.
Edit Screen Links
By default, above the post editing area is a link to Upload/Insert media in to the post.
Attachment to a Post
If a media file is uploaded within the edit screen, it will automatically be attached to the current post being edited. If it is uploaded via the
Media Add New Screen or Media Library Screen it will be unattached, but may become attached to a post when it is inserted into post. There also is an option on the Media Library Screen to attach unattached media items.
Note that media items are also ‘Posts’ in their own right and can be displayed as such via the WordPress Template Hierarchy. Themes can make use of this to loop over media items or create galleries.
If the parent post of an attached media item is deleted, the media item will become attached to the deleted post’s parent if it exists or if it doesn’t exist, the media item will become unattached and is open for re-attachment to another post.
Inserting in a Post
Once a media file has been uploaded, it may be?inserted in to a post.
When the media file is inserted you can choose to:
- Link directly to the media file
- Link to the attachment post, in which case the file will be served via the WordPress Template Hierarchy
- Not link to the media file (e.g. in the case of images, the image file will still be embedded in the page, but not linked to allow the browser to display the image file by itself)
Usage in Themes
Themes may use various template tags to display post attachments or utilize the?attachment.php?file to customize the display of attachments. A?shortcode?tag is also available to display a gallery of images attached to a post.
Further reading
]]>Adding images in WordPress is very easy. All of your images will be stored and can be managed in the Media Library, but you can take several different paths to get there.
The most common path is adding an image directly to a post or page. This automatically saves the image in the Media Library and displays the image wherever you inserted it.
You can also add images directly to the Media Library through the multi-file loader or the single-file loader.
Further reading:
Adding Images Through Pages/Posts
When writing or editing a post, you can add an image using the Add Media button above the editor box. This opens a window that displays the multi-file uploader. From here you can drag and drop your picture or select it using the file selector.
The images you add here will be automatically added to the Media Library.
Further reading:
- Inserting Images into Posts and Pages (Block Editor)
- Inserting Images into Posts and Pages (Classic Editor)
Miscellaneous
WordPress can resize images and create thumbnails.
Further reading:
Special Contents Using Images

- How to Use Gravatars in WordPress – Display avatars in your comment stream.
- Smilies – How to use smilies or emoticons on WordPress.